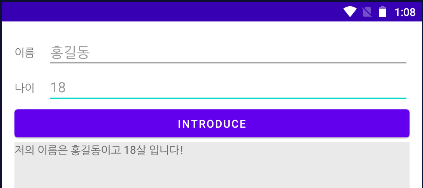
EditText로 값을 입력받고 버튼을 누르면

'저의 이름은 [이름]이고 [나이]살입니다!'라는 텍스트가 아래에 출력되도록 하였다.


1. MainActivity.kt

class MainActivity : AppCompatActivity() {

    private lateinit var binding: ActivityMainBinding
    val liveUser = MutableLiveData<User>()

    override fun onCreate(savedInstanceState: Bundle?) {
        super.onCreate(savedInstanceState)

        binding = DataBindingUtil.setContentView(this, R.layout.activity_main)
        binding.apply {
            activity = this@MainActivity
            lifecycleOwner = this@MainActivity  //지정해주지 않으면 liveData가 실시간으로 변경되지 않음
        }

        binding.btnOk.setOnClickListener {
            //버튼을 누르면 EditText에서 값을 받아와서 liveData의 값을 바꿔준다.
            liveUser.value = User(binding.etName.text.toString(), binding.etAge.text.toString().toInt())
        }
    }
}


2. User.kt

class User(val name: String, val age: Int) {

}

3. activity_main.xml

<?xml version="1.0" encoding="utf-8"?>

<layout xmlns:android="http://schemas.android.com/apk/res/android"
    xmlns:app="http://schemas.android.com/apk/res-auto"
    xmlns:tools="http://schemas.android.com/tools" >
    <data>
        <variable
            name="activity"
            type="com.monkey.databindingtest.MainActivity" />
    </data>

    <androidx.constraintlayout.widget.ConstraintLayout
        android:layout_width="match_parent"
        android:layout_height="match_parent"
        android:padding="16dp"
        tools:context=".MainActivity">

        <TextView
            android:id="@+id/tv_name"
            android:layout_width="wrap_content"
            android:layout_height="wrap_content"
            android:text="이름"
            app:layout_constraintLeft_toLeftOf="parent"
            app:layout_constraintTop_toTopOf="@id/et_name"
            app:layout_constraintBottom_toBottomOf="@id/et_name"
            />
        <EditText
            android:id="@+id/et_name"
            android:layout_width="0dp"
            android:layout_height="wrap_content"
            android:layout_marginLeft="16dp"
            app:layout_constraintLeft_toRightOf="@id/tv_name"
            app:layout_constraintRight_toRightOf="parent"
            app:layout_constraintTop_toTopOf="parent" />

        <TextView
            android:id="@+id/tv_age"
            android:layout_width="wrap_content"
            android:layout_height="wrap_content"
            android:text="나이"
            app:layout_constraintLeft_toLeftOf="@id/tv_name"
            app:layout_constraintTop_toTopOf="@id/et_age"
            app:layout_constraintBottom_toBottomOf="@id/et_age"
            />
        <EditText
            android:id="@+id/et_age"
            android:layout_width="0dp"
            android:layout_height="wrap_content"
            android:digits="0123456789"
            android:inputType="number"
            app:layout_constraintLeft_toLeftOf="@id/et_name"
            app:layout_constraintRight_toRightOf="@id/et_name"
            app:layout_constraintTop_toBottomOf="@id/et_name"
            />
        <Button
            android:id="@+id/btn_ok"
            android:layout_width="0dp"
            android:layout_height="wrap_content"
            android:text="introduce"
            app:layout_constraintLeft_toLeftOf="parent"
            app:layout_constraintRight_toRightOf="parent"
            app:layout_constraintTop_toBottomOf="@id/et_age"
            />

        <TextView
            android:id="@+id/tv_result"
            android:layout_width="0dp"
            android:layout_height="0dp"
            android:background="#EAEAEA"
            android:text="@{`저의 이름은 ` + activity.liveUser.name + `이고 ` + activity.liveUser.age + `살 입니다!`}"
            app:layout_constraintLeft_toLeftOf="parent"
            app:layout_constraintRight_toRightOf="parent"
            app:layout_constraintTop_toBottomOf="@id/btn_ok"
            app:layout_constraintBottom_toBottomOf="parent"
            />
    </androidx.constraintlayout.widget.ConstraintLayout>
</layout>


실행 화면


참고 사이트


View Binding과 Data Binding 예제

1. 들어가기에 앞서 2. 예제  2-1. 가장 기본적인 코드  2-2. View Binding  2-3. View Binding + ViewModel  2-4. View Binding + ViewModel + LiveData  2-5. Data Binding  2-6. Data Binding + ViewMode..

todaycode.tistory.com


LiveData(라이브 데이터)란?

1. LiveData란?  1-1. Observer  1-2. LiveData  1-3. LiveData의 장점 2. 사용법  2-1. gradle  2-2. LiveData 객체 생성  2-3. Observer 객체 생성 3. 예제 4. 더 알아보기  3-1. LifeCycleOwner  3-2...

todaycode.tistory.com


[DataBinding/LiveData] 안드로이드 DataBinding과 LiveData 같이 사용하기

안드로이드 DataBinding과 LiveData 같이 사용하기 - 기본  얼마전에 Android DataBinding의 사용과 LiveData의 사용을 알아봤습니다. 각각의 글에서 DataBinding은 LiveData와, LiveData는 DataBinding과 같이..

dev-imaec.tistory.com


I want to concat two strings for a TextView in android, Data Binding Api

Im using DataBinding Api for setting the views in android layouts. Here is my layout. layout.xml <?xml version="1.0" encoding="utf-8"?> <layout xmlns:android="http://schemas.android.com...

stackoverflow.com


링크는 프로덕션 버전이 출시 완료되면 올리겠습니다.

일단은 스크린샷부터 :D

내일쯤이면 검토가 끝나지 않을까 싶은데~

두근두근하네요^^


'개발 > Android' 카테고리의 다른 글

[Kotlin/코드] MVP (2)  (0) 2022.02.14
[Kotlin/코드] MVP 패턴  (1) 2022.02.14
[프로젝트] 8일차 - 캡처 & FileProvider & 공유  (0) 2021.09.27
[프로젝트] 7일차 - Room ( Database )  (0) 2021.09.25
[프로젝트] 6일차 - atan2  (0) 2021.09.25

1. 화면 캡처

원래는 view.getDrawingCache()를 사용했으나 이게 deprecated 되어서 다른 방법으로 캡처 기능을 구현하였다.


https://newbedev.com/view-getdrawingcache-is-deprecated-in-android-api-28


Programming tutorials | Newbedev

Checkout new tutorials and guides for programming languages Javascript, Python, Java, Golang, C++, PHP

newbedev.com

아래는 뷰를 캡쳐해서 저장된 파일의 경로를 가져오는 capture 메소드

fun capture(): String? {
    val now = SimpleDateFormat("yyyyMMdd_hhmmss").format(Date(System.currentTimeMillis()))
    val mPath = cacheDir.absolutePath+"/$now.jpg"

    var bitmap: Bitmap? = null
    val captureView = window.decorView.rootView	//캡처할 뷰

    bitmap = Bitmap.createBitmap(captureView.width, captureView.height, Bitmap.Config.ARGB_8888)

    var canvas = Canvas(bitmap)	
    captureView.draw(canvas)	

    if(bitmap == null) {
        return null
    }else {
        val imageFile = File(mPath)
        val outputStream = FileOutputStream(imageFile)
        outputStream.use {
            bitmap.compress(Bitmap.CompressFormat.JPEG, 100, outputStream)
            outputStream.flush()
        }
    }
    return mPath
}


2. FileProvider

https://keykat7.blogspot.com/2021/02/android-fileprovider.html

나는 캐시 디렉토리 안에 screenshots라는 폴더 안에 스크린샷을 저장하려고 했다.

그런데 파일에서 Uri를 얻기 위해서 FileProvider를 이용하여야 한다.


① resource에 fileprovider.xml 추가

<paths>
    <cache-path
        name="screenshots"
        path="." />
</paths>

② Manifest.xml에 코드 추가 

<application
    ...
    <provider
        android:name="androidx.core.content.FileProvider"
        android:authorities="com.test.packagename.fileprovider"
        android:grantUriPermissions="true"
        android:exported="false">
    <meta-data
        android:name="android.support.FILE_PROVIDER_PATHS"
        android:resource="@xml/fileprovider" />
    </provider>
    ...
/>

③ 이미지 공유하는 코드 추가

if(captureFile == null) {
    //캡쳐 실패한 경우
}else{
    try {
        val intent = Intent(Intent.ACTION_SEND)
        val fileUri : Uri? = FileProvider.getUriForFile(getContext(), "$packageName.fileprovider", captureFile!!)
        fileUri?.let {
            intent.putExtra(Intent.EXTRA_STREAM, fileUri)
            intent.type = "image/*"
            intent.flags = Intent.FLAG_GRANT_READ_URI_PERMISSION
            startActivity(intent)
        }
    }catch(e: ActivityNotFoundException) {
        //공유할 수 있는 어플리케이션이 없을 때 처리
    }
}


리스트를 내부 DB에 저장하고 불러오게 하고 싶었다.

라떼는 SQLite에 직접 접근해서.. (이하 생략)

요즘은 세상이 좋아져서 Room이라는 걸로 대신해서 쓸 수 있는 모양이다.


Room을 이해하기 위해서는 RoomDatabase, Dao, Entity 이렇게 세 가지를 이해해야하는데

이것은 다른 사람의 블로그나 공식 문서를 보면 아주 잘 설명이 되어 있으니

굳이 내가 적지는 않겠다.


다만, 나의 경우 데이터 모델이

val idx: Int
var title: String
var items: Array<String>

처럼 Array를 포함하고 있었는데, 이 경우에는 DB에 Array를 JSON 타입으로 저장하여야 했다.

그리고 이를 위해 @TypeConverter, @TypeConverters 어노테이션을 이용하여야 했다.


이는 아래 블로그를 참고하기 바란다.

https://jinsangjin.tistory.com/56


Room에서 List 사용하기 #Kotlin #TypeConverter #Android

Room에서 다음과 같이 선언하면 그냥 쓸 수 있을 줄 알았다. @ColumnInfo(name = "word_list") var wordList: List ?= null 하지만 다음과 같이 선언하고 build를 시작하면 error가 뜬다. 에러내용은 "typerConver..

jinsangjin.tistory.com


마지막으로 Room을 통한 DB 접속은 메인 스레드에서 실행될 수 없다.

따라서 코루틴을 사용하여 접근하였는데


CoroutineScope(Dispatchers.Main).launch {
    var dataList: ArrayList<SaveDTO>? = null
    CoroutineScope(Dispatchers.Default).async {
        val db = AppDatabase.getInstance(context)
        //DB에서 하는 일들
    }.await()
	//메인 스레드에서 하는 일들
}

이런 식으로 사용하였다.


이제 기본 기능은 얼추 완성된 것 같다.

남은 건 스샷찍어서 공유하는 것 뿐이려나..

Math.atan2를 사용하면 두 점 사이의 라디안 각도를 얻을 수 있다.


상대적인 위치이기 때문에 


Math.atan2(나중점.x - 먼젓번점.x, 나중점.y - 먼젓번점.y)를 해서 사용한 뒤


나온 값에 180을 곱하고 Math.PI로 나누어주면 우리가 아는 각도가 나온다.


나는 이걸 이용해서 설정모드일 때는 값을 설정하도록,

설정모드가 아닐 때는 터치한 곳의 값을 표시하도록 하였다.


+ Recent posts